Strongly Celestial Looking outward; looking backward in time... |
 |
||
 |
||||
Title: Remote Telescope Operation Purpose: To be able to fully control my telescope remotely from inside Status: Complete and operational! Synopsis The purpose of this project was to allow for the remote operation of my telescope, including the mount (slew, etc.), telescope focus, and imaging. Although the write-up will be specific for my particular hardware and software, the concept is easily reapplicable. |
||
Early Failures Attempt #1: Wireless Control
My first attempt at remote telescope control used this exact concept, with a fast wireless router and RealVNC software to communicate between the inside and outside PC's. This approach does work, but I had two significant problems:
Attempt #2: Wired Control This did significantly increase the speed of communication between my PC's, but I still detected some lag when viewing images (again like the sun) that are constantly moving. More importantly, this solution did not resolve issue #1 above, in that the outdoor PC was baking during the summer days and freezing during winter nights. Final Solution: USB Extender Cable Rather than providing a direct link (since items on Amazon no doubt move around over time), here is the exact description of the cable, which can be copy/pasted into a search engine to find it: "PTC - 20 Meters (64 Feet) USB 2.0 Active Extension / Repeater Cable A Male to A Female - Supports High Speed USB2.0 480 Mbps".
In my testing so far, this connection solution works perfectly, and it has the following huge advantages:
|
||
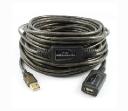 Normal USB cables are limited in length; typically about 10-15', which is far short of what would be needed for a remote telescope application. However, there are now reliable "repeater" USB cables which conform to USB 2.0 standards and vastly extend the possible cable length. Shown here, I purchased a 64' USB 2.0 extension/repeater cable from Amazon for about $35 (at the time of this writing).
 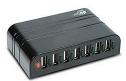 Because some of the the telescope control devices draw power from their USB connections, and given the length of this cable, I also bought via Amazon a
 Remote Operation - Overview
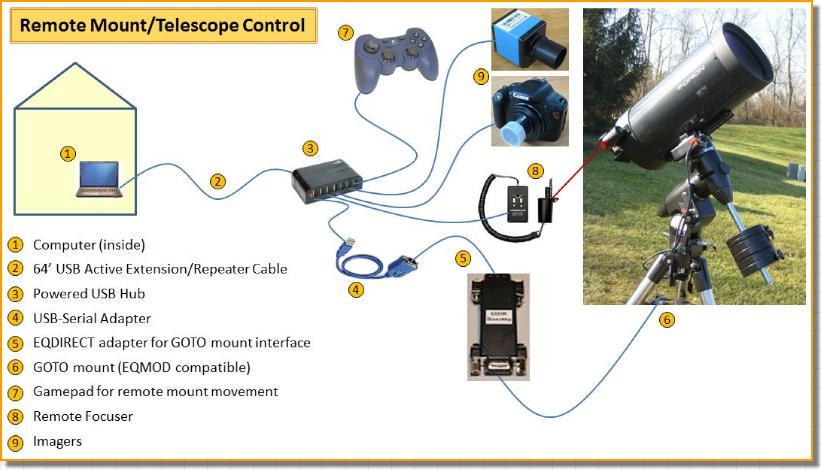
The following schematic depicts this system, and each element is described in more detail below: |
||
 |
||
The following are brief descriptions with links where appropriate for the elements numbered in the diagram above: |
||
The computer used for controlling the system does not need to be particularly powerful; my rig uses an HP Pavilion portable PC which is several years old and still running on Windows Vista. A few key criteria, though are:
The core software packages I am using in my system are:
|
||
This is described in detail earlier in this report. This actually was the most critical component for making my remote system work properly, with high speed and a single computer (inside)! |
||
This also is described in detail earlier in this report. I am not 100% sure that a powered hub is necessary, but with 4-5 USB devices all connected to a single (long) USB cable coming from inside, I am fairly sure that power for those devices at the telescope would be an issue without the hub itself providing some power. Besides, the cost difference for powered vs. not is trivial, so the choice was easy. |
||
Most laptop these days do not have a serial port on them any more, as the technology has migrated to USB. However, many telescope control adapters (including mine) require a serial port. The solution, of course, is a USB-serial adapter. Not all adapters are created equal...I went through two of them before finding one that works well with my computer (and operating system). I use a TRENDnet TU-S9 (here is their main website; search on the model), and it has been very successful for me. One IMPORTANT Note: Solution: |
||
Having solved the problem of communication from the PC inside to the equipment outside via USB, the next most critical step was the actual remote control of the mount itself. Many mounts come with PC interfaces, often via ASCOM ("Astonomy Common Object Model") software/drivers. The ASCOM website has a wealth of valuable information, including the current platform download, drivers for many mounts/devices, and links to key support websites. My particular mount (Orion Skyview Pro with GoTo) happens to be compatible with EQMOD, which is an ASCOM compatible software package that provides outstanding mount control via the PC (including the remote gamepad interface, listed in #7 below). On the EQMOD website, you can find the list of compatible mounts, download links for the software, and a lot of outstanding "How To" documentation. This should be your #1 stop if you want to learn more about software control of your mount; they even have handy tutorials for how to set up and align your mount to begin with! My mount has a SynScan hand control which does allow for Direct PC control. However, the EQMOD team recommends replacing the SynScan hand controller with an adapter to directly connect your PC to the mount (and bypass any "interpretation" the SynScan hand controller might do). The EQMOD website has instructions for how to build one, but the easy solution is to buy it from one of the vendors named. For my system, I bought an EQDIRECT adapter (pictured in the system schematic above) from Shoestring Astronomy (part # EQDIR at the time of this writing). In summary, my PC-mount interface is as follows:
So far my system works well, though I will admit I occasionally lose connection between the PC and the mount. I just have no way to know if this is caused by the mount, the EQDIRECT adapter, the USB hub, the long USB cable, or the PC software. It happens rarely enough for me to just deal with it when it happens. |
||
Obviously, in order to control your mount remotely, you must have a "motorized" mount, and these typically are the "GoTo" mounts widely available. As shown in my Equipment page, I have an Orion SkyView Pro mount with GoTo (which is an optional set of motors to control the mount's RA and Declination knobs), which uses the SynScan hand controller and is compatible with EQMOD as described in #5 above. Other popular mounts which should work just as well in this type of remote application are the GoTo's made by Celestron, such as the CG-5 or CGEM mounts. |
||
One inconvenience which crops up fairly often in a remote system is the ability to move or nudge the mount/telescope when you are standing outside with it. Perhaps you need to center an object a bit more exactly or just want to do some visual observations before connecting your remote imager. The problem is...the control system for the mount is now connected to the computer....which is inside! Solution: There are plenty of choices for USB gamepads. I happen to use a Logitech Dual Action USB gamepad, which works very well in my system. |
||
A remote focuser is not strictly necessary, but it is a handy addition. You can point the telescope at any bright star early in a viewing session, focus it manually at the telescope, and then leave it alone while you then operate everything from inside. That said, as the temperature changes, the focus may shift, and some astronomers report that they have some focus drift when they slew to new locations (I have not had this issue, but I am sure it's possible). In those cases, having a remote focuser that allows you to adjust the focus from inside right before imaging is handy. There are a number of options for this, depending on your telescope focuser and how much you want to spend. I went with a fairly low cost option: Orion AccuFocus Electronic Telescope Focuser (search the Orion site for that name). Note that depending on which telescope/focuser you have, you may need to do some "adapting" to get this motor to fit. Neither of my Orion telescopes was listed as compatible, but I got them both to work with a bit of handiwork on my workbench. The only problem with this device is that it comes with a local hand controller, not an interface for your PC. To solve this problem, Shoestring Astronomy makes a handy USB interface and software to control this focuser from your PC. Search for the product "USB Focus Motor Controller" on their site (part # FCUSB at the time of this writing). The total for the controller and the Orion focuser is in the range of $160 at this time. As an alternative, JMI Telescopes makes a whole line of focus motors and remote controllers. At the time of this writing, buying a focus motor and remote controller via this route is about 2x the cost vs. above. They do have, however, compatibility listed for many more commonly used telescopes/focusers. You may be able to offset some of the high cost delta by adapting the Shoestring Focus Motor Controller (listed above) to work with a JMI motor. The Shoestring website indicates they are compatible with JMI motors, and they are charging 1/2 for what appears to be the exact same controller...worth a look! |
||
You can plug any USB imager you want into your USB multi-port hub outside, and you are ready to go. See my Equipment page for the imagers I use in my system. Note: Even with very large RAW files, I have not detected any issue or loss of data when capturing images and transferring them through the USB multi-port hub, then across the 64' USB cable to reach my computer inside. And the imagers that produce .avi movies run at full speed (my Imaging Source normally runs at 30 fps and can get up to 60 fps in some cases) without issue. |
||